
For the Network Connection
You can select one of the following installation methods.
-
Recommended Install: Installs recommended printer drivers automatically
-
Custom Install: Installs printer drivers you select to install
For network connection, you must set an IP address to the printer.
Installing Software with Recommended Install
-
Check that the printer and a computer are connected and the printer is turned on, and then insert the "Software DVD-ROM" into the computer.
-
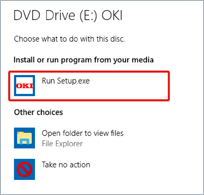
When [AutoPlay] is displayed, click [Run Setup.exe].
Memo
If the [User Account Control] dialog box is displayed, click [Yes].
-
Select a language from the drop-down list.
-
Read the license agreement, and then click [Agree].
-
Read the "Environmental advice for Users" thoroughly, and click [Next].
-
Select [Network(Wired/Wireless)], and click [Next].
-
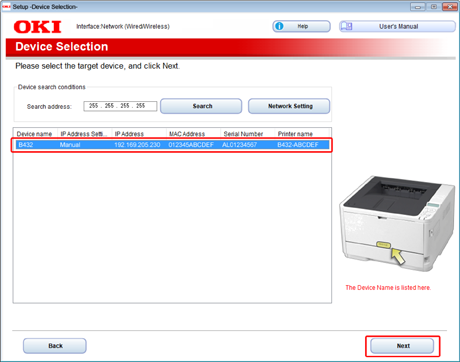
Select the printer to be used, and click [Next].
-
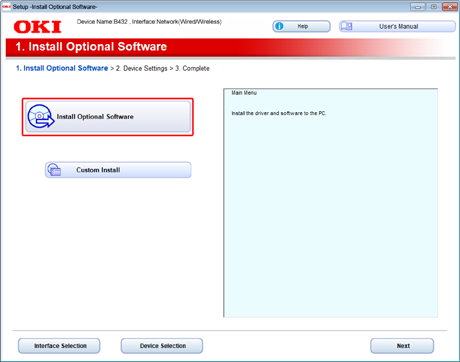
Click [Install Optional Software].
Memo
The following software will be installed.
PCL6 printer driver (including Network Extension)
Other software is installed with a custom installation.
-
Check that the software installation is complete, and click [Printing Test].
Select the printer for the test print, and click [Printing Test].
Check that the test print has been performed, and click [OK].
-
Click [Complete].
-
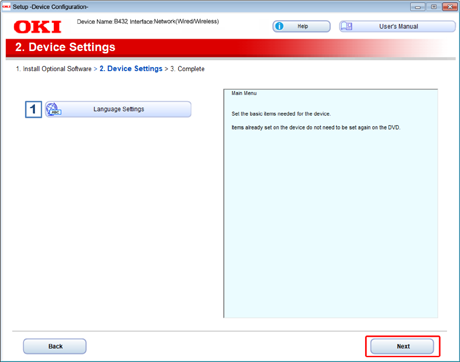
Click [Next].
-
Click [Exit].
-
Remove the "Software DVD-ROM" from the computer.
Installing Software You Want to Use with Custom Install
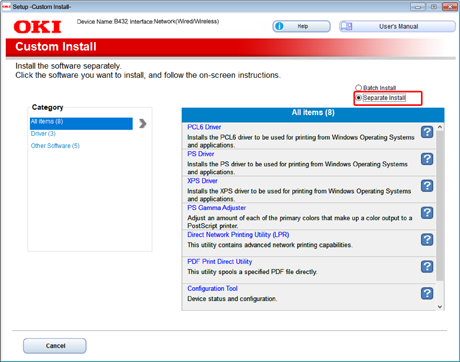
With Custom Install, you can select the printer driver to use from the following printer drivers.
-
PCL printer driver
-
PS printer driver
-
XPS printer driver
Note
The PS printer driver is not available with B412.
-
Check that the printer and a computer are connected and the printer is turned on, and then insert the "Software DVD-ROM" into the computer.
-
When [AutoPlay] is displayed, click [Run Setup.exe].

Memo
If the [User Account Control] dialog box is displayed, click [Yes].
-
Select a language from the drop-down list.
-
Read the license agreement, and then click [Agree].
-
Read the "Environmental advice for Users" thoroughly, and click [Next].
-
Select [Network(Wired/Wireless)], and click [Next].
-
Select the printer to be used, and click [Next].
-
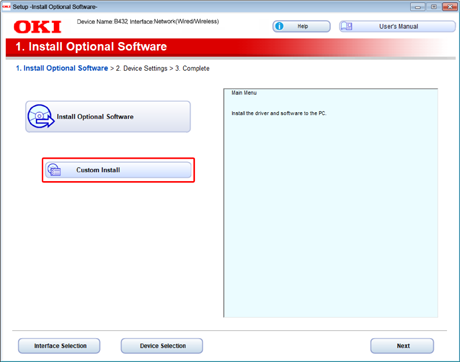
Click [Custom Install].
-
Click [Separate Install].
-
Click the printer driver you want to install.
Installation starts.
-
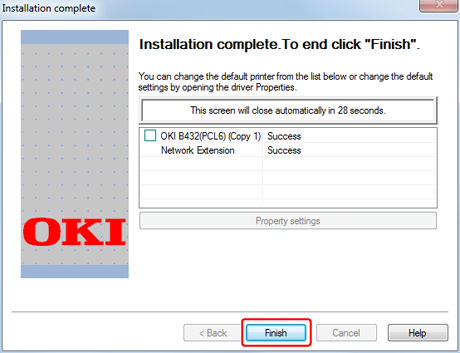
Click [Finish].
-
Click [x] in the upper right of the [Setup] window to close it.
-
Click [Start] from the Windows menu, and then select [Devices and Printers].
-
Check that the [OKI B432] icon is displayed.
Right-click the [OKI B432] icon, select printer properties, and then check that all printer drivers are displayed in the sub menu.
-
Remove the "Software DVD-ROM" from the computer.
-
Perform a test print from the computer.
Memo
To perform a test print, click [Start] from the Windows menu, right-click the [OKI B432] icon in the [Devices and Printers] window, select [Printer properties] > [OKI B432 (*)] > [General] tab, and click [Print Test Page].
* Select a printer driver type by which you want to perform a test print.