Installing the Second Tray Unit (Optional) to the Printer
If you want to load more paper, install the second tray unit (Tray 2). You must set the printer driver after installing.
Note
The PS printer driver is not available with B412.
Installing the Second Tray Unit (Optional)
Model: N22204A

Memo
The second tray unit may be displayed as [Paper feed expansion unit] or [Tray 2].
For details on the specifications of the second tray unit (Tray 2), refer to "About Paper Types That Can be Loaded and Storage Methods".
-
Turn the printer off, and then unplug the power cord and the printer cable.

Note
If the tray is installed while the printer is turned on, the printer may malfunction.
-
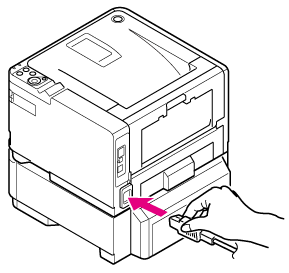
Lift the printer, and then align the three pins of the second tray unit with the holes at the bottom of the printer.

-
Place the printer on the second tray unit gently.

Memo
Remove the second tray unit in the reverse order of installation.
-
Plug the power cord and the unplugged cable, and then turn the printer on.
When the printer is turned on, the power switch LED lamp is lit.

-
Print a menu map to check that the second tray unit is installed correctly.
-
Check that "TRAY2" is printed in "MEDIA MENU".
Memo
If the information about Tray 2 is not displayed in the menu map correctly, repeat the procedure from step 1.
Setting the Printer Driver
Check the type of the printer driver that is installed in your computer, and then refer to the corresponding description.
Note
-
To follow this procedure, you must log in to a computer as the administrator.
-
You must register the printer driver in the computer in advance.
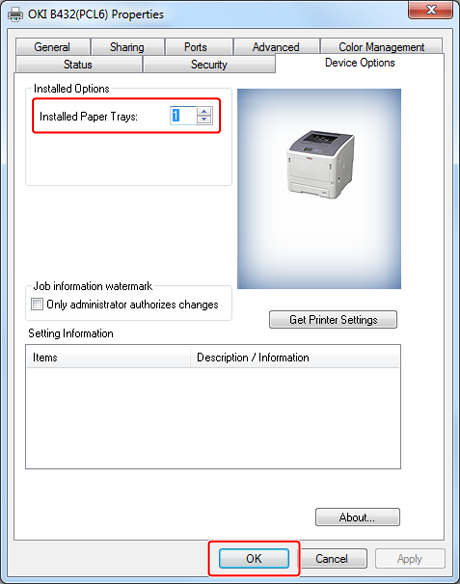
Setting Tray 2 (Optional) to the Windows PCL Printer Driver
-
Click [Start], and then select [Devices and Printers].
-
Right-click the [OKI B432] icon, and then select the printer driver to be used from [Printer properties].
-
Enter [2] for [Installed Paper Trays] on the [Device Options] tab, and then click [OK].
Memo
If a TCP/IP network connection is used, click [Get Printer Settings] to set the driver automatically.
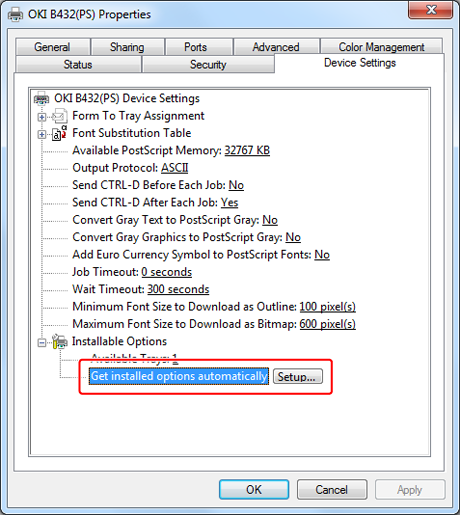
Setting Tray 2 (Optional) to the Windows PS Printer Driver
-
Click [Start], and then select [Devices and Printers].
-
Right-click the [OKI B432] icon, and then select the printer driver to be used from [Printer properties].
-
Select [Get installed options automatically] for [Installable Options] on the [Device Settings] tab, and then click [Setup].
When using a USB connection, select [2] for [Available Trays] in [Installable Options].
-
Click [OK].
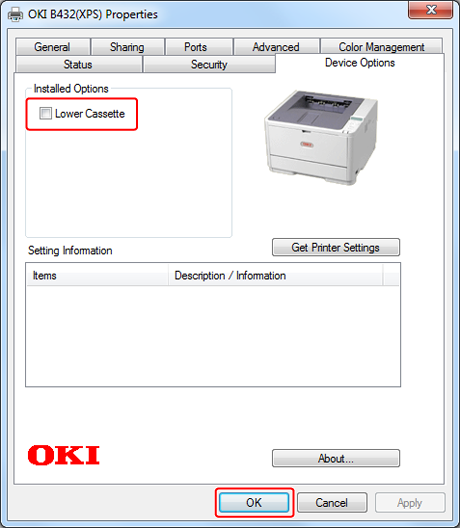
Setting Tray 2 (Optional) to the Windows XPS Printer Driver
-
Click [Start], and then select [Devices and Printers].
-
Right-click the [OKI B432] icon, and then select the printer driver to be used from [Printer properties].
-
Select the [Lower Cassette] check box under [Installed Options] on the [Device Options] tab, and then click [OK].
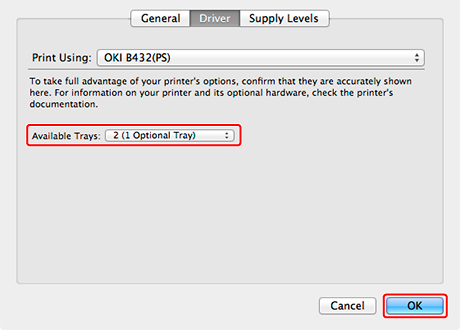
Setting Tray 2 (Optional) to the Mac OS X Printer Driver
-
Select [System Preferences] from the Apple menu.
-
Click [Print & Scan].
-
Select [OKI B432], and then click [Options & Supplies].
-
Select the [Options] tab.
-
Select the [Available Trays] check box, and then click [OK].